How to Get Tomatoes to Ripen Faster (5 Proven Methods)
Still waiting on green tomatoes? These 5 practical methods shift your plant's energy toward ripening fruit faster — starting this week.

How to Get Tomatoes to Ripen Faster (5 Proven Methods)
You've done the work. The plants are in, they're growing, and they're loaded with green fruit. But here it is, midsummer, and nothing is turning. The good news: ripening speed isn't just about luck or weather. Several specific practices directly influence where your plant puts its energy — and shifting that energy toward ripening existing fruit, rather than producing endless new growth, can move your harvest noticeably earlier. Here are five concrete methods that work.
Quick Answer
To get tomatoes to ripen faster, prune indeterminate varieties to a single main stem to redirect plant energy toward existing fruit. Water deeply at the soil level only, and switch to a phosphorus-and-potassium-forward fertilizer once plants are actively flowering. Adding two to three inches of organic mulch around the base stabilizes soil moisture, improves calcium uptake, and keeps the plant focused on finishing fruit rather than fighting stress or disease.
Method 1 — Single-Stem Pruning (Indeterminate Varieties Only)
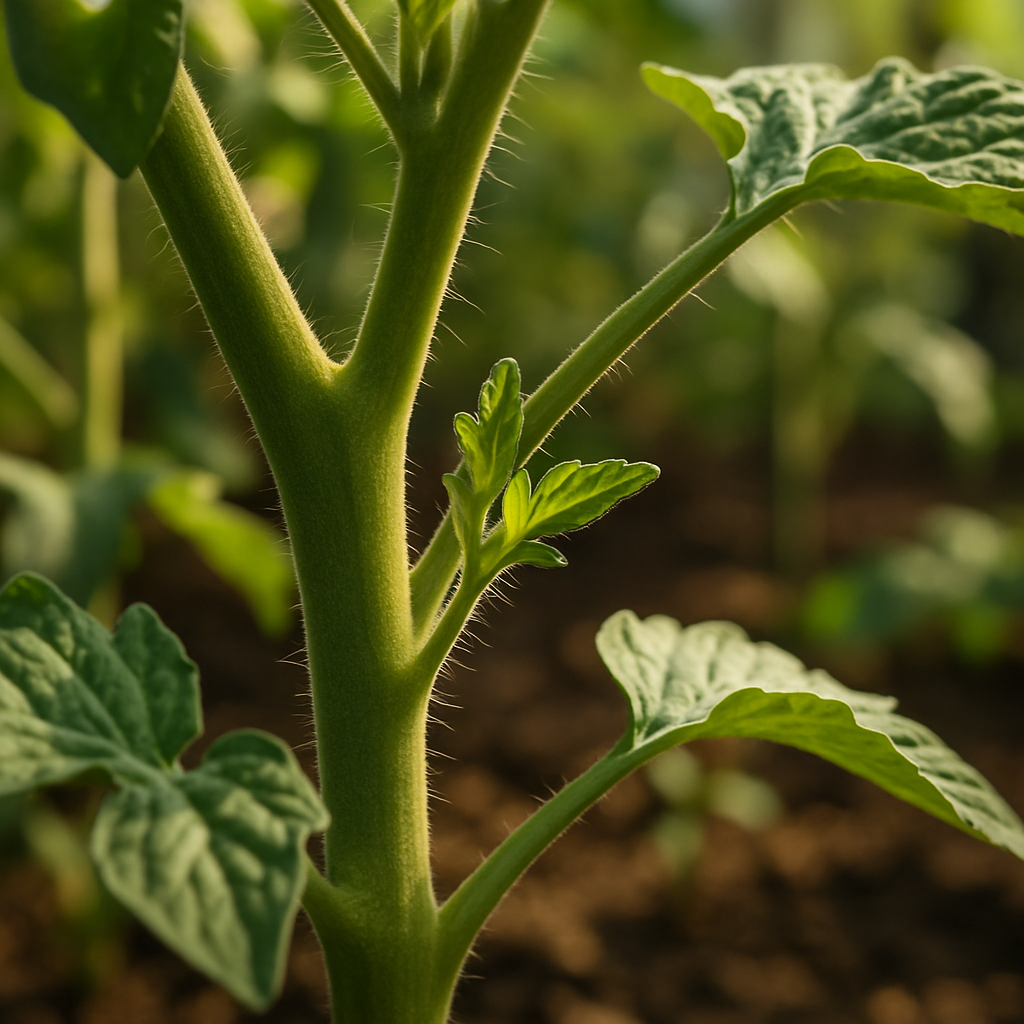
This is one of the highest-impact changes you can make mid-season. Indeterminate tomatoes — the kind that keep flowering and setting fruit until frost — naturally push out new shoots called suckers in the V-shaped joint between the main stem and each leaf branch. Left unchecked, these become full secondary stems, and the plant shifts into producing more green growth instead of ripening what it already has.
Training to a single main stem keeps the plant's energy pointed at the tomatoes already on the vine.
How to do it:
- Identify suckers by looking for shoots growing in the V-shaped crotch between the main stem and a leaf stem. They're distinct from flower clusters or fan leaves.
- Remove suckers when they're small — pencil-diameter or less. At that size, you can snap them off cleanly with your fingers.
- For larger suckers, use clean pruners. Wipe the blades with isopropyl alcohol before moving to the next plant.
- Don't overdo it in one session. If your plant is already bushy, remove a few suckers at a time over several days — removing too much at once stresses the plant and can stall production.
- Keep the main stem tied to a trellis or stake as it grows upward.
Opening up the canopy also lets sunlight reach the fruit directly, which accelerates ripening and improves flavor. Better airflow reduces fungal disease pressure as a bonus.
One exception for hot climates: If you're growing large-fruited varieties like beefsteaks in a high-sun location, allow one or two well-placed suckers to provide some leaf cover on the fruit. Tomatoes fully exposed to intense direct sun with no foliage can develop sunscald.
Important: This pruning approach is for indeterminate varieties only. Determinate tomatoes are bred to produce one concentrated flush of fruit and stop. Aggressively removing suckers from a determinate plant will reduce your total harvest. For determinates, only remove lower leaves that touch the soil or show signs of disease — leave the rest alone.
The Sucker-Fruit Technique (Advanced)
Rather than removing every sucker entirely, you can let a sucker grow until it flowers and sets a small cluster of fruit, then pinch out the growing tip above that cluster. This captures extra production from the sucker without letting it bush out or divert energy into endless vegetative growth. It's a useful approach for gardeners who want to maximize yield per square foot without giving up the airflow benefits of a more open plant.
Method 2 — Choose Earlier-Ripening Varieties
If you're planning ahead — or still have time to add plants this season — variety selection is one of the simplest levers available. Some cherry tomato varieties are known to come in two to three weeks ahead of standard slicers. Those extra weeks matter enormously in shorter-season climates.
Variety selection also lets you target specific challenges. Plants with strong resistance to early blight stay healthier longer and keep setting fruit later into the season. A plant that collapses to disease in August can't ripen everything it set in July. Growing a range of types, including a few fast-maturing varieties alongside your main crop, spreads your harvest across a longer window and reduces the risk of everything struggling at once.
Method 3 — Fertilize with the Right Nutrients at the Right Time
Timing and formula both matter here. The most common mistake is continuing to use a high-nitrogen fertilizer once plants start flowering. Nitrogen pushes vegetative growth — more leaves, more shoots, more green. During the fruiting stage, that's the opposite of what you want.
Once your plants are actively flowering and setting fruit, switch to a fertilizer that's balanced or weighted toward phosphorus and potassium. These nutrients support flower production, fruit set, and the ripening process itself.
JP's Secret Stuff™ All-Purpose Organic Fertilizer 3-3-3 is an OMRI-listed balanced organic option that works well as a granular top-dressing during the fruiting stage. Work it lightly into the soil surface around the base of each plant and water it in. Granular feeding provides a steady, gradual nutrient supply rather than a spike-and-crash cycle, which keeps the plant consistently supported without triggering a burst of leafy regrowth.
Feed proactively — before you see yellowing or struggling plants. Once deficiency symptoms show up, the plant is already behind.
Method 4 — Mulch the Base of Every Plant
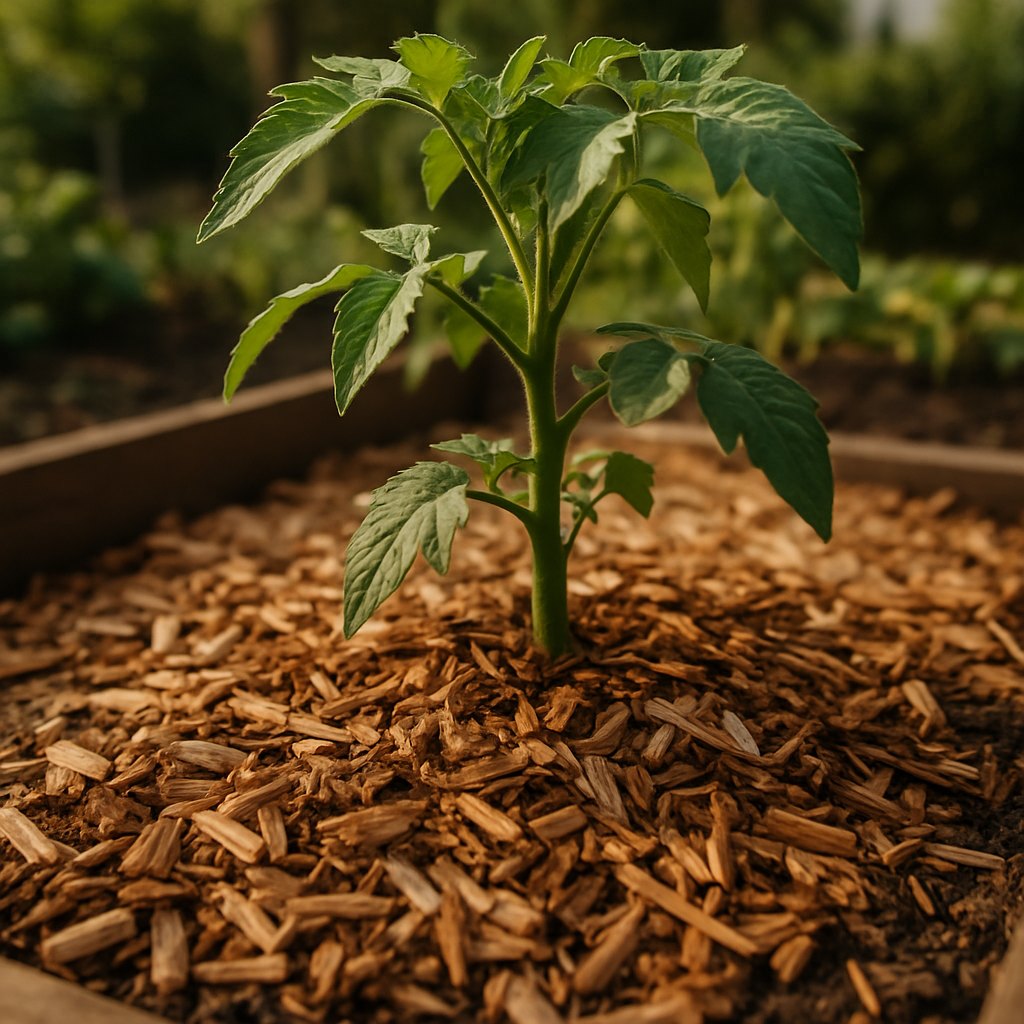
A two-to-three-inch layer of organic wood chip mulch around the base of each tomato plant does several things at once:
- Holds soil moisture between waterings, reducing drought stress
- Moderates soil temperature during heat spikes
- Prevents rain or irrigation from splashing soil particles onto lower leaves — a primary entry point for early blight and other soil-borne diseases
- Suppresses weeds that compete for water and nutrients
The moisture-stability benefit is especially important for calcium uptake. Calcium is immobile in the plant — it can only move upward through consistent water flow. When soil swings between soaking wet and bone dry, calcium doesn't reach developing fruit properly. The result is blossom end rot: that familiar dark, leathery patch on the bottom of your tomatoes. In most garden soils, calcium levels are fine. The problem is irrigation inconsistency, and mulch is one of the most practical fixes.
Keep mulch a few inches away from the main stem to avoid trapping moisture against the crown of the plant.
Method 5 — Water Correctly at the Base
How you water matters as much as how much you water. Overhead watering — sprinklers, hoses arced over the plant — wets foliage unnecessarily and dramatically increases disease pressure. Warm, humid conditions plus wet leaves creates the perfect setup for early blight to spread fast. A plant fighting disease is spending energy on self-defense instead of ripening fruit.
Water at the base, directly at soil level. Deep, infrequent watering encourages roots to grow deeper, where soil moisture is more consistent. If you can't avoid overhead watering (rainfall, for instance), timing matters: morning is far better than evening, because leaves have the full day to dry before nighttime humidity sets in.
Common Mistakes
- Pruning a bushy plant all at once. Removing too much growth in a single session shocks the plant and can stall production. If you're starting to prune for the first time on an overgrown plant, remove a few suckers per session over several days.
- Staying on high-nitrogen fertilizer during fruiting. This produces lush, green, leafy plants with very few ripe tomatoes. Check the NPK numbers on your fertilizer label. Once flowers appear, nitrogen should not be the dominant nutrient.
- Watering overhead with a sprinkler or hose. This is one of the most common and most preventable causes of early blight. Switch to base-level watering and keep foliage as dry as possible.
- Skipping mulch and letting soil dry out between waterings. This is the most frequent root cause of blossom end rot. Most gardeners reach for a calcium supplement when what the plant actually needs is consistent moisture.
- Pruning without sanitizing tools between plants. Pruners can carry fungal and bacterial pathogens from one plant to the next in a single session. A quick wipe with isopropyl alcohol between cuts is a simple habit with real disease-prevention value.
FAQs
Does pruning tomatoes actually make them ripen faster, or is that a myth?
It's well-supported in practice. Redirecting the plant's energy away from new shoots and leaves toward ripening existing fruit does accelerate the process. Single-stem plants consistently produce harvestable fruit earlier than heavily bushy ones grown under the same conditions.
Should I prune determinate tomatoes the same way I prune indeterminate ones?
No. Determinate tomatoes are bred to produce one concentrated flush of fruit and stop. Aggressive sucker removal on a determinate variety reduces your total harvest. For determinates, only remove lower leaves that touch the soil or show disease — leave the rest alone.
What's the difference between a sucker and a regular branch?
Suckers grow specifically in the V-shaped joint between the main stem and a leaf stem. They're easy to miss when tiny but grow quickly into full secondary stems. Catching them at pencil-diameter or smaller makes removal easy and low-stress for the plant.
My tomatoes have blossom end rot. Do I need to add calcium to my soil?
In most cases, no. Garden soil typically has adequate calcium. The problem is usually inconsistent watering that prevents calcium from moving up into developing fruit. Improving watering consistency and adding mulch to stabilize soil moisture is usually the fix — not a calcium supplement.
What can I do about tomato hornworms organically?
BT (Bacillus thuringiensis) is a well-regarded organic option that is safe for food crops and effective against caterpillar pests including hornworms. Apply it when you spot feeding damage or the caterpillars themselves. Early intervention matters — hornworms grow fast.
Action Plan: Do This Week
- Walk your indeterminate tomato plants and remove small suckers by hand. If you've never pruned before, start with just a few per plant — don't try to reshape the whole plant in one session.
- Check your fertilizer label. If you've been using a high-nitrogen blend, switch to a balanced organic fertilizer. Apply JP's Secret Stuff™ All-Purpose Organic Fertilizer 3-3-3 as a granular top-dressing around each plant and water it in.
- Lay two to three inches of wood chip mulch around the base of your tomato plants, keeping it a few inches back from the main stem.
- Adjust your watering. Switch to deep, base-level watering only. Water in the morning when possible, and stop any overhead watering that wets the foliage.
- If you're planning for next season, start researching early-maturing and blight-resistant varieties now. Adding two or three faster-ripening options to your seed order puts you ahead from the start.
None of these changes require starting over. Most of them can be in place this week — and your plants will respond.
Related blogs
Holes in your leaves? Here's the organic pest control system that matches the right tool to the right pest — before more damage is done.
August isn't too late — it's prime time for fall planting. Learn which crops to plant now, how to time them, and the tricks that actually work.
Mid-summer garden slump is normal — here's how to inventory what's still working and take action now for a strong fall harvest.
Still waiting on green tomatoes? These 5 practical methods shift your plant's energy toward ripening fruit faster — starting this week.
Skip the hilling, still get a real harvest. Here's how deep planting and one mid-season step make raised bed potatoes genuinely low-effort.
Too many tomatoes? Here are 6 practical ways to freeze, can, dry, and sauce your garden harvest so nothing goes to waste.
Break your raised bed into a simple grid and grow 2–3x more food from the same space. Here's exactly how to set it up.
No yard? No problem. Learn how to grow tomatoes, peppers, and more in 5-gallon buckets with the right soil, watering, and fertilizing strategy.
Wood chips can build incredible soil — or wreck a bed. One mistake makes all the difference. Here's what actually works.
Seeds from a fast food tomato can grow into a real plant — here's how to extract, germinate, and grow them successfully.